


 It is such a relief, a release really, when I can stop my crazy schedule and create something new. Too much of what I seem to be doing these days is looking back at old work, reviewing stock photos for clients, or editing photos taken years ago. Creating something new is what I ache to do. Off into the garden . . .
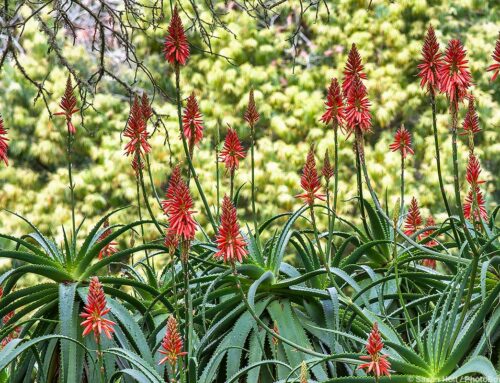
The Gingko trees have finally grown to where they dominate my garden, created for fall color. It is pure good fortune that the Sassaqua Camellias peak bloom is exactly the same time as the peak color of the Gingko.

It is even more luck that the bright yellow stamens in the flowers of Camellia ‘Yuletide’ match the butter yellow of the Gingko leaves.
I planted these trees along my driveway when we moved in 15 years ago. They are the variety ‘Fairmont’ which have upward sweeping limbs that I hope keep the trees somewhat columnar, but I’m finding that is a relative term. Time changes our gardens and how we appreciate them, but in this moment these trees are exactly what I expected and wanted.
Today was the day to pay them homage the best way I know – with photos, a photobotanic illustration. It begins with looking. Looking for a composition I can isolate in a single flat plane. This is much easier for me in recent years as, more naturally now, my eyes see two dimensional shapes and space, almost automatically.
Immersing myself in and around the trees, at eye level on this, the largest of the Gingko trees obscured by Camellias, I found small branch angling straight up from a major limb. Exactly what ‘Fairmont’ is supposed to do. The plan was to make an ‘extraction’ photo, one where I isolate or silhouette a feature of the plant I want to celebrate.
 When I make these extraction photos I use PhotoShop to make a silhouette and drop out the background. I like the extractions to be plant portraits that are obviously in nature, not isolated like a botanical drawing. For the Gingko branch I saw lots of trouble ahead in trying to isolate the sharp focused leaves, in the branch I wanted to feature, against all the other overlapping and out of focus leaves.
Rather than edit out in Photoshop later, I began to edit the scene in the camera, cutting back some Camellia, then carving out dark areas, removing one leaf at a time in the composition that would allow the leaves and branch to stand out. When removing individual leaves from the branch itself I was careful to create negative space, dark areas, around the leaves that would be in balance with the yellow. Pay close attention to those small dark spaces.
Once the branch was isolated, the rest on the vision is in the computer, in Photoshop with the Selection tool.
I have become much more proficient in these tools the more I use them. For those who know these tools, I start with the Quick Selection tool for broad strokes then alternate between the Magnetic Lasso and standard Lasso tool at 400% magnification to get really clean edges. It is a bit tedious but worth the effort so that there are no halos or unexpected edges in the final edit.

When I make these extraction photos I use PhotoShop to make a silhouette and drop out the background. I want the extractions to be plant portraits that are obviously in nature, not isolated like a botanical drawing.
Usually I drop the background out by about 60-80% transparency but for this one I found darkening the background layer made the yellow really pop.

This is an alternative view with the background lightened. I’m not sure which one I will release as a print; perhaps both.

However the most exciting photo was the one I took after completing the vertical composition for the extraction. I will usually look for horizontals and verticals for every strong photo I find, often thinking of magazine layouts that are double page. If an editor really likes a vertical they might look for a way to spread it across two pages if a horizontal is available.
Backing off from the scene a bit so that when I turn the camera to horizontal, the original vertical composition can still fill the frame top to bottom, I have a new photo to work with.

As soon as I saw the potential of this horizontal, I began to build it up. There is some great structure to this composition with the lines of the trees and branches and the Camellia filling about 1/3 of the frame. (My workshop students are seeing me smile, eh?)
What does it need to tie the camellia and Gingko together a bit ? How about a couple more red flowers and some more yellow in the dark ‘hole’ upper right ?

Suddenly it fell together.
What really makes it work for me is subtle but critical, making a dynamic composition, tying the picture together. Adding the flowers helps distribute the red more evenly but most importantly, the dark camellia leaves, made more distinct by adding the yellow behind them, now mirror the dark negative shapes between the yellow leaves on the original.
That connection, that interplay of shapes, needed to be brought out with a more painterly abstraction of the photo. Opening my Photoshop toolbox for my Topaz Impression plug-in I used Liquid Lines then began to fiddle with brush strokes, details, and finally the color hues.

There is a lot of blue color in the shine of the Camellia leaves. (Note the red cross hatching in the screenshot, delineating the area of blue being affected.) By making that blue go to navy I could accent the darkness and the the swirl of the brush strokes made the shapes very similar. It it especially noticeable in the dark spaces between the most prominent Gingko leaves – the focal point really.

What a fun day. I got to create.
Buy this as a framed print or Notecard in the Store.


Thanks for these detailed instructions on how to get good pictures in our own gardens. Too often, I’ve been ‘snapping’ what’s there, and wondering later how to fix the composition in Photoshop.
I haven’t groomed the plant in the garden for the picture’s composition. I’ll make sure I take my clippers, plant clamps and florist ties the next time I go to shoot in my garden.
And thanks for the instructions on getting the most out of Topaz Impressions Liquid Lines.
Thanks Marilyn – your are quick study I can see.
This is great Saxon. I do not have Photoshop, but use Aperture. At present this seems to match my ability! I did take a course in Photoshop and found it mind-boggling – like all new and worthwhile technology! Thanks for the inspiration. Dick
All those programs have mind-boggling potential. I find I learn/explore by a lot of trial with a very small section at a time, and try not to get distracted by all the features. Thanks for stopping by.
Until I read this, I had never come across Topaz. I really love your Topaz altered Camellia leaves.
I have questions but one question may make any other questions superfluous at this time.
Can you tell me whether you will reveal more about how you use Topaz in your “Camera and Computer”
lessons?
Andrew – The Topaz filters are great and I already go into some detail in some of the lessons in Plants Celebrated section, and yes I will most certainly talk about them in the “Camerand Computer”
However, I talk about them as plug-in filters. There are many plug-in filters for all sorts of cameras, from smart phone apps to PhotoShop. The Topaz filters are one powerful set, but like all computer work, require some hands on learning to understand all the permutations of each tool, and a reason to use them. Every time I use the filters I try something different, as I am looking to say something different. There are many photo websites that will give exact recipes for special effects that require detailed explanations; I won’t be doing that.